Thankfully, there exist a few third-party tools that can help us add and use Mac Style Hot Corners in Windows 10. One of those tools is ‘WinXCorners’ which we have covered in this post. This is an open-source and portable tool that lets you enable Hot Corners in Windows 10. Using this WinXCorners tool, you can set any of the four corners of the Windows 10 screen to open Action Center, launch Task View mode (to preview all opened windows), hide background applications and show only foreground or active window, turn off monitor, launch Screen Saver, or turn off laptop screen or the monitor. You just have to configure this tool once and hover the mouse cursor to any of the corners of the screen. The action set by you will be triggered immediately. What I find more useful is you can set a custom command for Hot Corners. For example, you can launch some browser, Notepad++, or some other application when moving the mouse cursor to a particular corner of the screen. In the image above, you can see its configuration box where I have set different actions (including custom command) to all the corners of the screen. Note: This tool is not supported for multiple screens/monitors. So, you should use it on a single screen device only.
Add Hot Corners in Windows 10
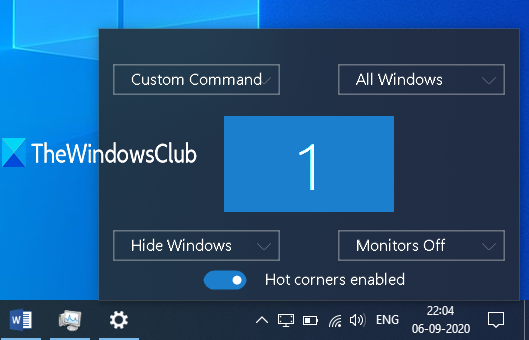
To use Hot Corners in Windows 10 using this tool, download its zip file, and extract it. After extracting that zip, open the folder where you extracted the zip file, and execute WinXCorners.exe file. Now the tool will start running in the system tray of Windows 10. Click that system tray icon and the Hot Corners box of this tool will open, just like you can see in the image below.
There are four drop-down menus for each corner (top left, top right, bottom left, and bottom right) of the screen. Use a drop-down menu and you can assign any of the supported actions for that corner. For example, you can use Action Center for the top left corner. Just select an action of your choice. This way, set actions for all corners, and you’re done. Whenever you will place the mouse cursor to any of the corners, the associated action is triggered quickly.
Now, this tool might create trouble sometimes. For example, you might forget the tool is running and you accidentally move the mouse cursor to any of the corners, and the action is triggered. To overcome such an issue, you can use its Hot Corners box and turn on/off Hot Corners enabled button anytime you want. Apart from the above configuration, you can also access its Advanced Options to set the time delay for each of the corners to trigger the action. Moreover, it is also helpful to set a custom command for Hot Corners. For that, right-click on the system tray icon of WinXCorners tool, and select Advanced option.
In the Advanced Options box, you can set time delay (in ms) for all corners separately using the given options. In the same box, there is a Custom Command (Launcher) field. Here, you can paste the path of some program or application, and then tick mark Enable Custom Command option. This will help you show the custom command option in the drop-down menus of the Hot Corners box so that you launch that particular application just by placing your mouse cursor to the associated corner.
Press OK to save the changes. That’s all. You can download this tool here. Using this tool was an interesting experience for me! For your information, Tiny Hot Corners is another tool thatlets you add GNOME-like Hot Corners to Windows 10. Hope this will be useful to you and many other users who want to add and use Mac-style Hot Corners to their Windows 10 PC.