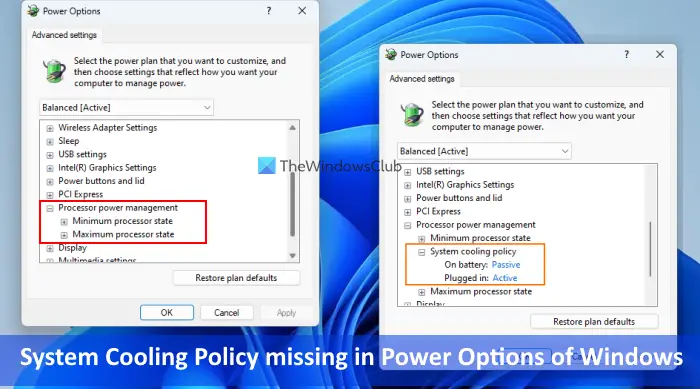
The System Cooling Policy is a built-in feature in Windows 11/10 and is a part of Advanced power settings. It helps to change the cooling mode of your computer and you can set or change the System Cooling Policy setting to Active mode or Passive mode. While the Active System Cooling Policy mode increases the fan speed before slowing the processor, the Passive mode on the other hand slows the processor before increasing the fan speed. For laptops, you can set the same or different cooling modes for battery mode and plugged-in mode. Now if you can’t find the System Cooling Policy setting, then there are two workable solutions covered in this post to show in Power Options of Windows 11/10.
System Cooling Policy missing in Power Options of Windows 11/10
If System Cooling Policy is missing in the Power Options of Windows 11/10, then you can add it using the following solutions:
Using Registry EditorUsing the Command Prompt window.
You should create a system restore point before using these solutions. Now let’s check both options one by one.
Add the System Cooling Policy setting in Power Options using the Registry Editor
The steps to add the System Cooling Policy setting in Power Options using the Registry Editor method are as follows:
Click on the Search box of your Windows 11/10 PCType regedit and press Enter keyJump to the 94d3a615-a899-4ac5-ae2b-e4d8f634367f Registry key. Its full path is here:
You will find an Attributes DWORD value in the right section. If it is not present, then right-click on an empty area, select New, and use DWORD (32-bit) Value option. Rename that DWORD value to AttributesDouble-click the Attributes value to open the edit boxAdd 2 in the Value data field. This value is needed to add System Cooling Policy in the Power Options box. If the Value data is set to 1, then it removes or hides the System Cooling Policy optionPress the OK button to close the edit boxClose the Registry Editor.
This will work instantly and the System Cooling Policy option will be shown under the Processor power management section. If it doesn’t, then you should restart your system.
Show System Cooling Policy setting to Power Options using Command Prompt
The Registry Editor method explained above is manual and a bit lengthy. If you want, you can also add or show the missing System Cooling Policy setting in Power Options using the Command Prompt window. For doing so, run Command Prompt as administrator and execute the following command: This command adds 2 in the Value data field of Attributes DWORD value (in the Registry Editor) to add or show System Cooling Policy. In case you want to hide or remove the System Cooling Policy setting from Power Options for some reason, you can do that using the following command: This command actually changes the Value data of Attributes DWORD value in the Registry Editor from 2 to 1 to hide the System Cooling Policy.
Which is better Active or Passive System Cooling Policy?
The Active cooling mode increases the fan speed and consumes more power that you might not find helpful when using a laptop. If you are a laptop user, you can set Active cooling on Plugged-in mode and Passive cooling on Battery mode for power saving. If you are a desktop user, you can use the Active mode to maintain cooling. Hope this helps. Read next: Best Laptop Cooling software for Windows.